How to install the Facebook pixel on your website?
A short step-by-step guide to adding that famous piece of code.

What do I need a pixel for?
The Facebook pixel is that famous “wizard” that lets us track what users do, target ads better and measure how they perform. With the pixel we can check not only how many people clicked a link, but also how many of them added a product to their cart, filled in a contact form or made a purchase. Sure, as customers we aren't necessarily keen on ads that follow us around, which is why a lot of Poles use an adblocker, but remarketing paired with the right ad creative can work wonders!
Examples? Here you go!
An ad for a cosmetics store I had browsed without buying anything called me back with the line “Don't you care about beautiful skin anymore? Come back to us and take care of yourself”. Perfectly aimed copy for a woman – after all, which of us doesn't care about looking good and staying healthy?
Another effective way to win a customer's attention through remarketing is to give them a discount on the product they looked at but didn't buy – a discount convinces most people, whatever their gender 😉
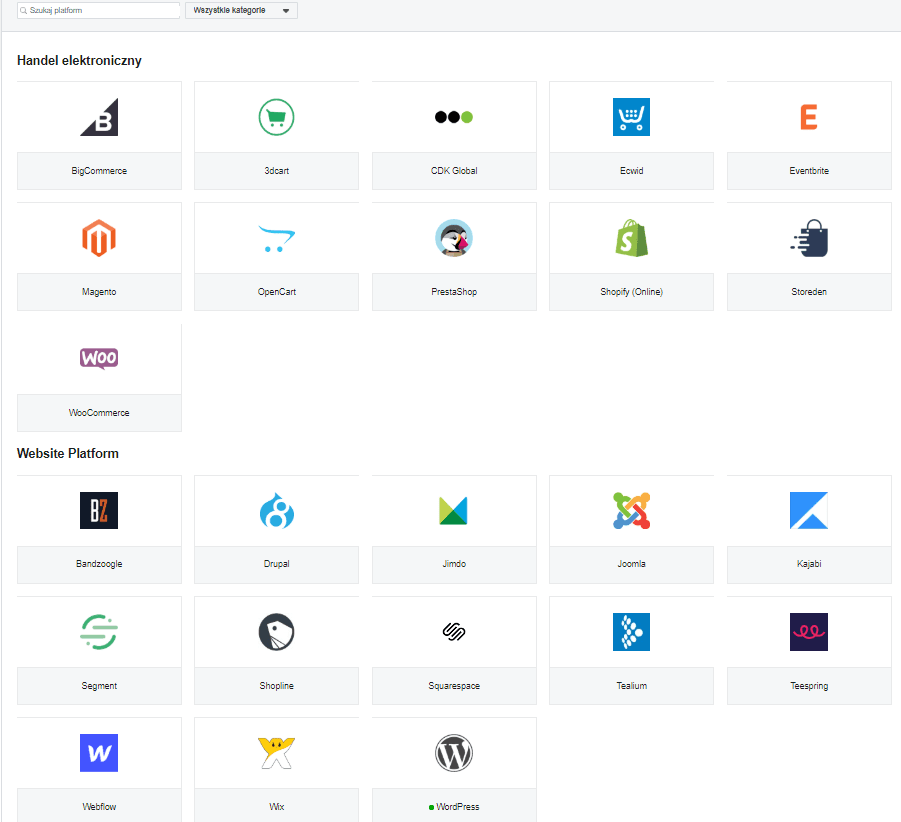
Unfortunately, while switching an ad on in Facebook is fairly intuitive, “poking around” in a site's code keeps a lot of business owners up at night. Completely unnecessarily. Most small and mid-sized company sites are built on one of the popular platforms: wordpress, joomla, wix, shopify and so on. You'll find the full list of Facebook partners in your Business Manager, by clicking Events Manager and then partner integrations.
But let's start with the basics.
Where do you find your own pixel code?
To install the Facebook pixel you need to set up a Business Manager and then an ad account. You'll find detailed step-by-step instructions here and here.
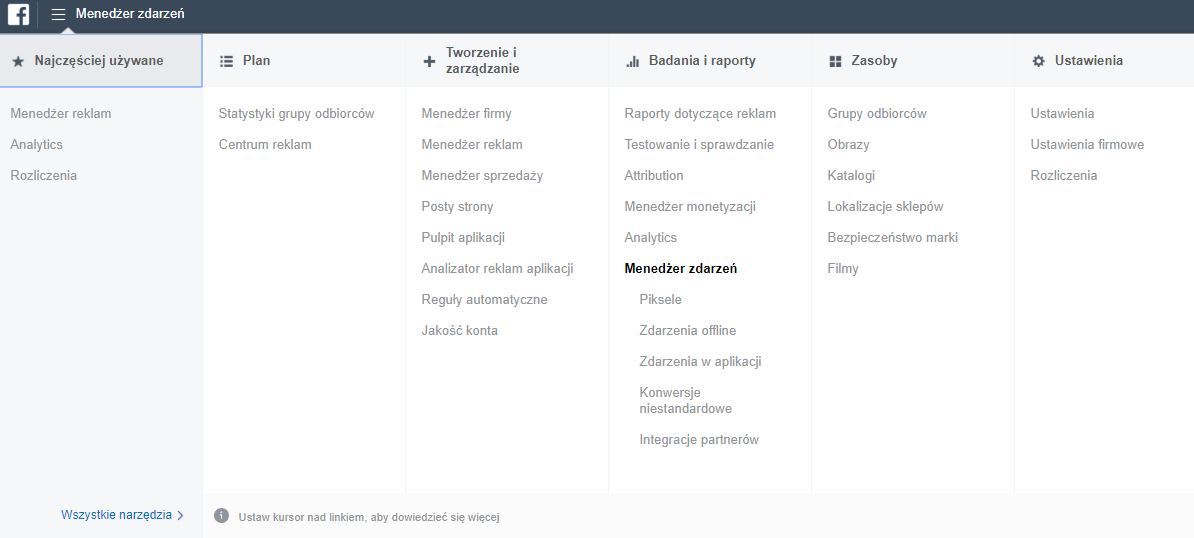
Once you have a Business Manager and an ad account, click the menu in the top left corner and a tab like the one below will open. Then click Pixels, and you'll get your own basic code, the so-called pageview, which tracks who visited and who landed on the site. Importantly, there is only one pixel per site; if you install it on several, the numbers won't be right.
One more thing you'll find useful is the table of so-called event codes, which is identical for every account.
And… what next?
There are two options – once you pick “Pixels” you'll see a chart, and in the top right corner the options: set up (use that one if you know your way around code) or share (if you want to send it to your developer).
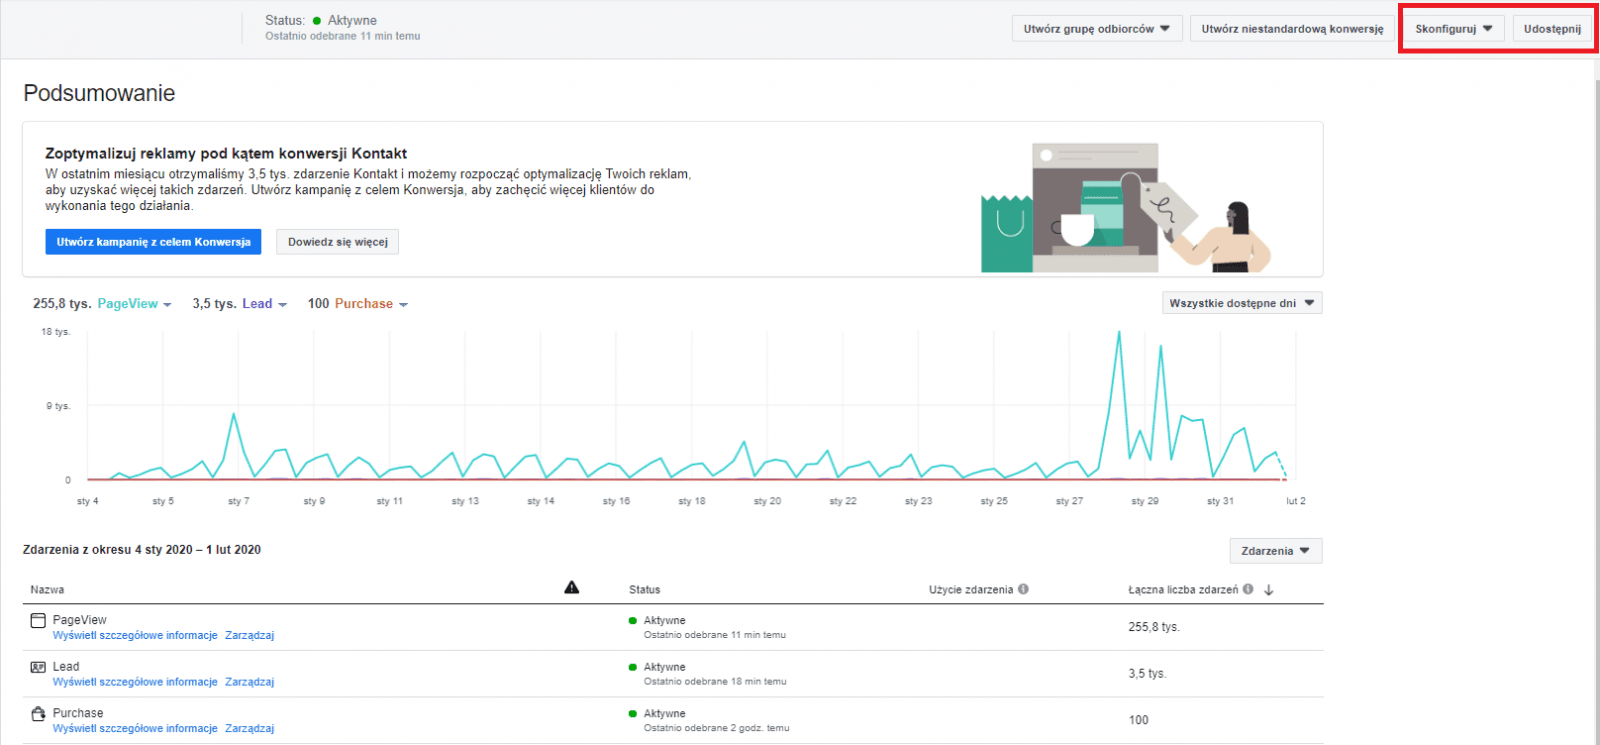
If your site runs on a popular platform that integrates with Facebook, you'll manage on your own. If not, you'll have to send the pixel code together with the events table to whoever looks after your site and can paste the code in for you. So let's take the simpler option, the one where we assume you'll manage on your own.
If you're not sure which platform your site is built on, you can use a dedicated extension, e.g. wapalyzer (chrome). Go to your site, click the wapalyzer icon in the top bar, and you immediately get the answer: wordpress, shopify or something else. That tells us whether we can hook the pixel up ourselves or whether we need a developer's help.
If your site is one of Facebook's partners, all you do is go into the admin panel, click plugins, add new, pick the Facebook one, and tick which events the code should track.
If you're still having trouble installing the code or you aren't sure how to do it, get in touch – we'll gladly help.
 AdvertisingSocial LamaTop 6 industries for influencer marketingInfluencer marketing today is a great deal more than a campaign on Instagram. In a well-run strategy it can beat paid social — provided the brand understands how context, trust and the power of a community actually work. In some industries, working with creators is already a fixed part of the marketing funnel. In others, it is still treated as a bolt-on “for reach.”READ POST
 AdvertisingSocial LamaEmployee advocacy – how to talk about work your own way (and why it's worth it)Have you ever thought that your presence online could help your company reach more people? Employee advocacy comes up more and more often, but what does it actually mean, and why are more and more companies adopting it? In theory: imagine posting a photo from a team training session on LinkedIn, writing a few sentences about an inspiring project you've just finished, or simply sharing a company post with a short comment: “great to be part of this team!”READ POST
 AdvertisingSocial LamaHow to write an effective marketing brief: a step-by-step guideA marketing brief is the key document that sets out the detailed information about a marketing campaign — its goals, its strategy and the client's expectations. Prepared properly, a brief lets an ad agency or a creative team get the work done efficiently and removes the risk that what the project is meant to do gets read the wrong way. A well-written advertising brief shapes the success of your campaign, keeping the message consistent and the work effective. If you want to raise brand awareness, drive sales growth or build strong brand communication, you need to make sure the document contains the key information, tailored to the project and to the specific industry.READ POST